Unless you went to film school (or have watched a lot of tutorials on YouTube), there are going to be things you don’t know about filmmaking. And more often than not, those things will include specific terms — textbook-type definitions, shorthand slang words, etc.
If someone mentions a specific term in a video, you could pretty easily look up what it means…unless you’re out on a shoot, collaborating with another filmmaker or working with a freelance client.
The same idea applies to video editing terms too. Sure, that’s something you’ll almost always do on your own. But knowing some of the most commonly used terms will help you sound more like an expert, and it’ll also give you a better understanding of how other creators edit their videos.
Some famous person said that knowledge is power. And like anything else, learning new things will only help your channel and the video content you produce. Apply that mindset to video editing and you will quickly see big improvements in the quality of your video content.
That all begins with the basics: video editing terms you’ve probably heard before but may not fully understand. Hopefully, by the end of this article, you’ll know what each word means and whether or not you want to watch tutorials to learn how to master these concepts.
Popular video editing terms you need to know
You can’t underestimate the importance of post-production for YouTube videos, given how competitive the platform has become. And an easy way to approach this is to look at some of the most common video editing terms and what they mean/represent for content creators.
All of the following words should include a definition without sounding like a stuffy textbook. And we’re including visual illustrations for most of them. Hopefully that gives you exactly what you need to internalize — and then incorporate — these words into your video editing process.
Aspect ratio
If you’ve ever tried to edit footage from two different cameras, or a camera and a phone, you’re probably familiar with how important aspect ratio is for video editing. You’ve probably seen 16:9 before, which has become a standard aspect ratio that fits on just about everything.
Aspect ratio is just a way to write the relationship between the width and the height of a display/screen, a sensor/camera/lens, or your footage. Consistent aspect ratios make sure that the video you shoot maintains its size and doesn’t get smooshed into a weird box or stretched into an ultra-wide format.
B-roll
B-roll is sort of a buzzword in YouTube content circles, but in a practical sense, it’s something that a lot of filmmakers take for granted.
In a nutshell, b-roll is footage you capture to set the scene or avoid monotony. It’s like support footage, like a cutting away from a living room interview to a shot of the building exterior. Here’s an example of what that looks like:
(If this sounds like something you could take advantage of on your channel, we’ve got a post that dives really deep into how to find and use b-roll for your video projects.)
Color grading
This particular term is half of the coloring process. Color correction, like the name implies, is the process of adjusting the color and exposure of the footage so it looks right, or as close to “real life” as you can achieve. You’re just establishing a foundation for visual realism.
Color grading, on the other hand, is all about bringing your creative vision to life. Editors who specialize in color grading pump so much style into footage that it takes on a new tone and vibe, regardless of the actual camera cuts, on screen action, or audio tracks.
This is one of the video editing terms you definitely want to see in action:
And yes, if you are capturing and integrating b-roll into your project, you’ll want to make sure it’s color corrected and graded to consistently deliver the same composition.
Color temperature
While we’re on the topic of color, let’s take a step back and get a little more general here.
You’ve probably noticed how certain lights or even certain times of day can make footage feel warm or cool. We won’t get into the heavy scientific explanation of it, so just remember that the color temperature of lights produce a psychological effect on us as viewers.
Color temperature is measured on the Kelvin Color Temperature Scale, which translates the intensity of a light source and indicates the “color” or tone that this light will produce.

Here’s a 7-minute tutorial on the Kelvin scale
That’s why it’s so important to understand — so you can take control over that part of visual storytelling. Fortunately, any popular video editing software will have some sort of built-in coloring tool. So you’ll be able to tackle color correcting and color grading within the workflow you use to cut the footage and make other edits.
Compositing
Compositing is like your golden ticket to creative freedom. It’s the technique of combining two or more images/visuals together by layering one on top of the other.
While that can sound extremely technical, compositing has become a key piece of editing:
The most popular use of this is CGI and green screen footage, compositing one piece of video footage on top of another to create something “new.” It’s pretty much a staple of most modern films, which means it’s something a lot of content creators are looking to master as well.
Continuity editing
The easiest way to remember continuity editing is “the way you’re probably already editing videos.” It’s the process of cutting together different shots and even scenes so that they flow together. The viewer shouldn’t be aware of the cuts and edits, which is why people also refer to this process as “invisible editing.”
Establishing shot
An establishing shot is like a first impression. Except instead of one per video, you can have as many as you want. Establishing shots are used to introduce any location or character, and you could argue the term also applies to inanimate objects like props or even themes.
This particular term is fairly straightforward. So rather than drag out a description, here’s a collection of establishing shots pulled from movies you’ve probably seen:
Frame rate
Frame rate is like aspect ratio — it’s one of those video editing terms you’ve probably picked up from following tutorials, playing video games, or even just watching movies.
Each video is a collection of thousands or millions of still images. (It’s how our brain processes visual data, which explains why traditional film influenced so many modern terms.) And the frame rate is how quickly a video moves through the frames/images.
Think about a stop motion film, or even a flipbook. The frame rate would be how quickly you jump from still image to still image — it determines how lifelike movement is, which plays a big role in how believable or “natural” a video seems to the viewer.
24 frames per second is the standard frame rate, since it’s pretty close to the speed our brains process visual information in the world around us. Fewer than 24 and the video is stuttery; more than that and our brains start to blend details together.
Jump cuts
Everyone loves a good jump cut. They’ve become an almost essential part of vlog editing and YouTube content, and most content creators have a “signature” cut that they use all the time. So this is one video editing term you’ve seen, even if you didn’t have a name for it yet.
A jump cut is an abrupt transition between shots. Spend 5 minutes and you could probably think up a dozen clever ways to mask this cut, and you’ve probably seen a few on YouTube. But the reality is that while jump cuts can be stylish or scrappy, they’re still effective.
Some filmmakers use a jump cut to create tension, making the viewer uncomfortable; others rely on jump cuts to build or maintain energy, like in a good training montage. Or you might have to use an unexpected cut to hide a mistake, like a distracting car horn or an actor sneezing on an otherwise perfect take.
J cuts
A J cut is a split edit where the audio from the second clip starts to play over video from the first clip. Think of it as an audio cue, where the viewer might hear seagulls or waves while the video lingers on a person in a warehouse, then cuts to footage from a beach.
The goal of a J cut is basically to create anticipation for what’s to come, teasing the next shot or scene while still lingering over the visuals of the current shot.
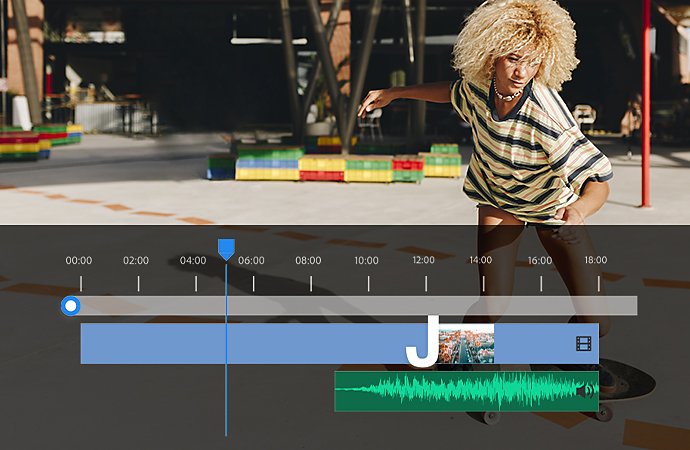 Here's Adobe's example of a J cut in Premiere Pro
(We actually have a handy dandy video editor’s guide to J cuts and L cuts if you want to learn more and see video examples.)
L cuts
After defining a J cut, the L cut should be a pretty easy video editing term to cover…because it’s really just the opposite of the J cut.
Let’s refer to our previous example. In the case of an L cut, the video would cut from the person standing in a warehouse to a quiet beach. Meanwhile, the audio from the first scene — maybe distant cars, or buzzing overhead lights, or noisy machinery — continues to play over the footage of the beach.
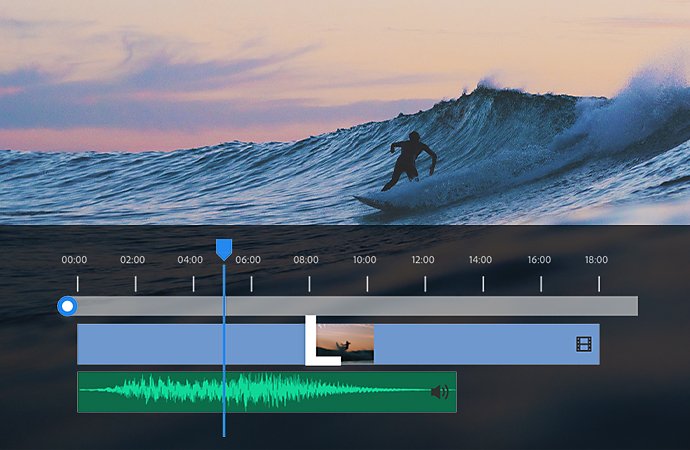
Here's Adobe's example of a L cut in Premiere Pro
The purpose of the L cut isn’t all that different from its “sibling.” Each is a way to hold the audience’s attention on something, either to establish a relationship between the shots or to try and carry over an emotion or atmosphere between scenes.
Lower third
A lower third is basically an overlay placed over the footage and located in the — you guessed it — bottom third of the screen. (We’ll cover overlays in a few minutes.)
You may have seen them in news coverage or as a way to indicate who is on screen during an interview video. It’s basically a way to share information with the audience without having to re-introduce someone every time they appear on screen.
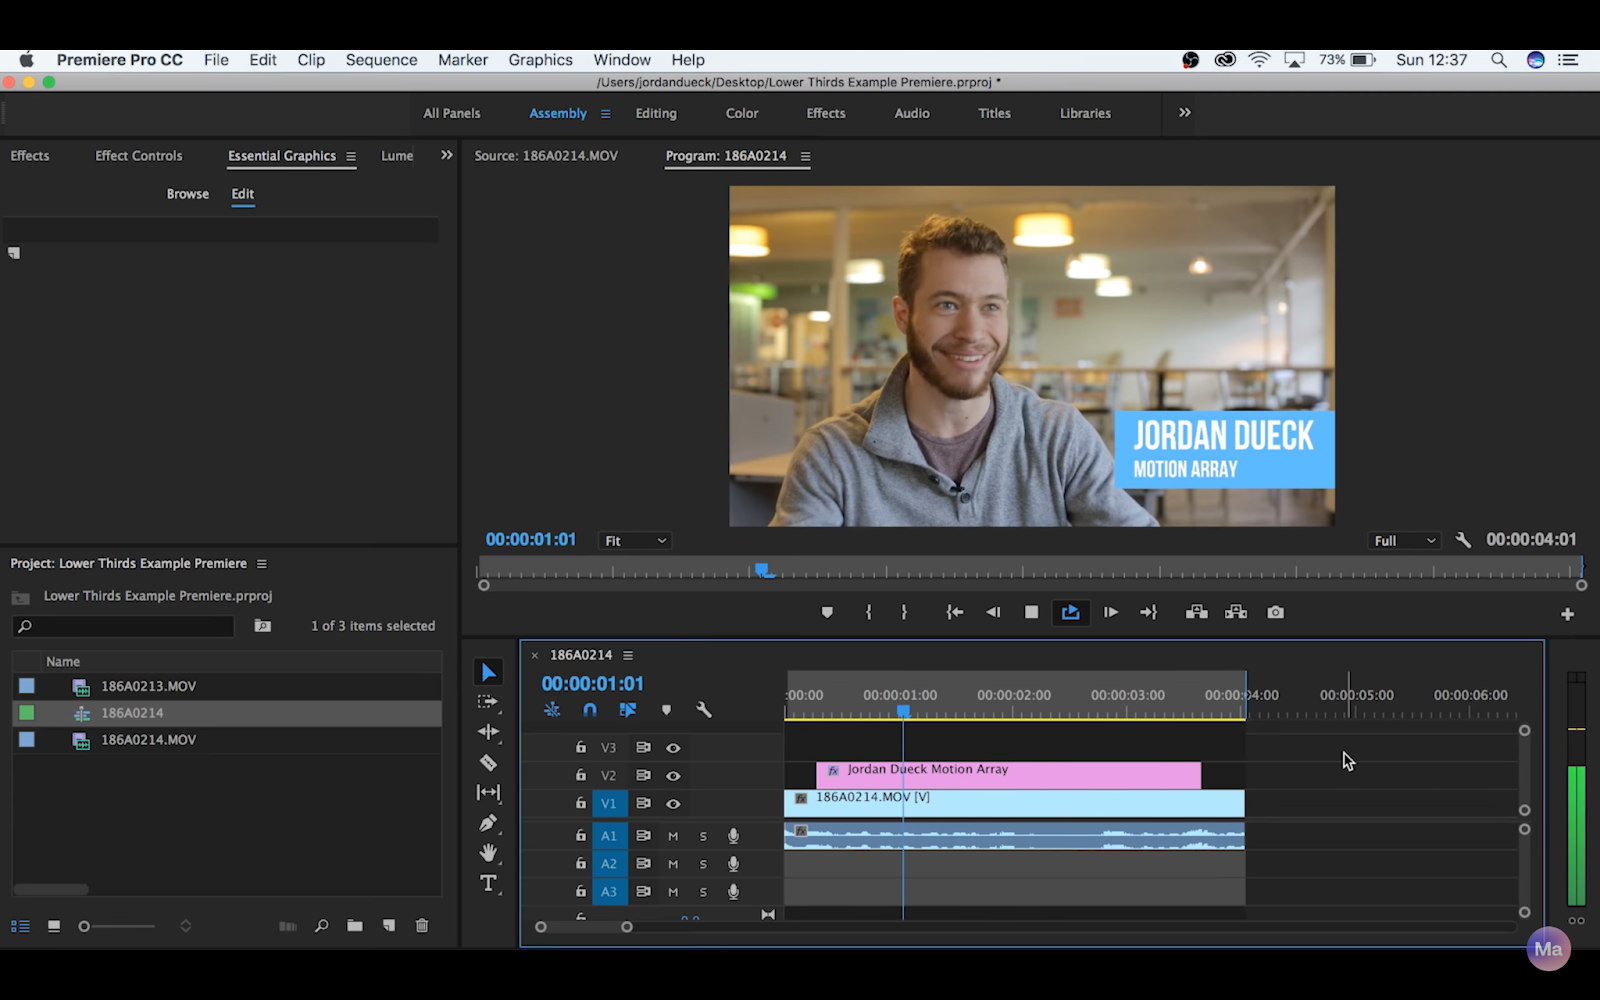
Technically speaking, lower thirds aren’t common in a lot of YouTube content. But if you work on corporate videos, travel vlogs, or anything that could benefit from extra details, then lower thirds are easy to add to a project and are pretty commonplace across the industry.
Non-linear editing
Non-linear editing is a clear example of how each creator approaches editing differently, and basically summarizes the process of using a video editing software.
The best part about non-linear editing is that you aren’t adjusting the original footage — you’re creating copies on your timeline, which frees you up to experiment with your edits. You don’t need to expect to make a perfect video on your first round of edits, because you’re already in the habit of bouncing around and tweaking different pieces of footage until it feels right.
Overlay
An overlay is something placed over the video clips in your timeline to change how they look. That might be a black-and-white overlay, or adding film grain or lens flare in post-production without having to manually add them in yourself. For the most part, they serve as a kind of “drag and drop” VFX to help you stylize your footage without a ton of work on your end.
The most valuable thing about overlays is that you can make huge changes to how your video footage looks without having to edit or affect the original video files in any way.
RAW footage
RAW footage is unedited footage collected on a video camera, and it extends to digital as well as traditional film. It’s all of the stuff you combine, edit, and transform into your YouTube content, which means it hasn’t been color corrected or touched up in any way.
No matter how you use RAW footage (client work, wedding videos, vlogs, short films, etc.), it’s as much a part of your creative process as your gear or your creative ideas.
Three point lighting
Lighting is an influential part of video production. It can literally make or break any project, determining where or when you can shoot and affecting your process in so many other ways.
We could spend the next hour talking about the history of three point lighting, different ways to use it in your YouTube videos, and even whether or not you should invest in a professional video kit. (Here’s a deeper look into lighting for YouTube.)
So three point lighting is just a standardized, tried-and-true method of lighting that you can use on just about any video you work on. That means it’s a term creators and filmmakers use pretty often, which in turn means it’s important for you to know and understand.
Further reading
Video editing can be complicated and confusing, even for experienced filmmakers. And that’s especially true when you want to try a new technique or develop a new skill without completely wasting your time or footage.
The goal of this list is to avoid that. These video editing terms are popular enough (and useful enough) that they should absolutely be a part of every YouTuber’s vocabulary. And once you master the techniques attached to them, you’ll be creating better content than ever before.
If you’re interested in getting even more advice for growing your YouTube channel, here are some other recommendations from the Soundstripe blog:

