*Updated April 2022
A pretty big part of the post-production stage is editing. And when it comes down to the details of editing a video, each filmmaker or creator has their own process for how they handle it.
We won’t assume that you follow the same steps as our in-house video team. (In fact, you may prefer a completely different video editing software. That’s pretty common for creators.)
But given the general popularity of Adobe Premiere Pro for filmmakers, let’s look at a few of the most useful Adobe Premiere keyboard shortcuts.
If you pick up a couple shortcut keys out of this list, you’ll be saving yourself time and effort every time you sit down to edit. Saving a few seconds here and there adds up pretty quickly when you think about the hundreds of hours you’ll spend in post-production.
And that makes it a pretty helpful resource. So let’s get to it.
20 Adobe Premiere Pro Shortcuts To Make Your Life Easier
When I started writing this post, I underestimated just how many useful Adobe Premiere Pro shortcuts exist. The list is technically closer to 30 items, because a couple include multiple shortcuts that are related or use the same key. (These command shortcuts add more versatility in how each one can be used.)
But the more the merrier, right?
To be clear, we are only going to cover the default keyboard shortcuts out there. You’ve got the option to customize any Premiere Pro keyboard shortcut, or even delete shortcuts you don't use or want to assign to something else. Adobe really gives you the power to adjust your workflow, even if it's as significant as rebinding the Selection Tool to become the Razor Tool (although you probably won't want to change basic shortcuts you're already familiar with).
But that’s obviously too complicated for us to cover all of the possible shortcut keys out there. So instead, here are a whole bunch of keyboard shortcuts that you might already be using or may want to start using on your next project.
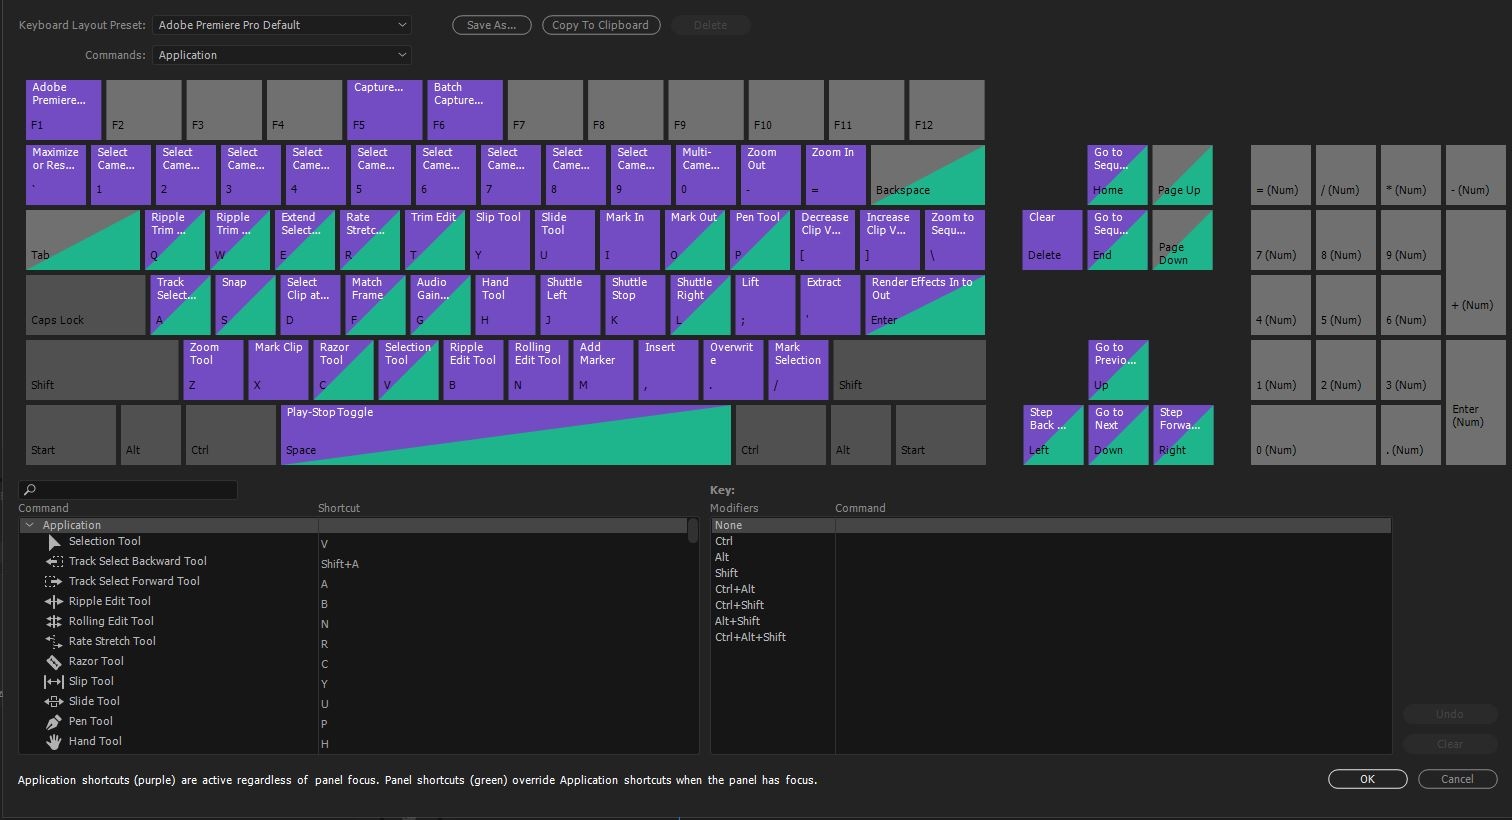
Zoom in to focus on a specific sequence (=, -)
You’ll probably be zooming in and out of your timeline as often as you breathe or blink. So any shortcut that simplifies or streamlines this is an easy pick for our Most Valuable Shortcut award.
In fact, this shortcut is so useful that it’s got three sub-shortcuts attached to it. And since they all have different shortcut keys, we'll list them out for you:
- Shift + =/- will expand or minimize timeline tracks.
- Ctrl + =/- will expand or minimize video tracks.
- Alt + =/- will expand or minimize audio tracks.
Create mark in and mark out points (I, O)
Marking is basically setting the “in” and “out” points of a clip. Use “I” to create a mark in point and “O” to create a mark out point without having to scroll through a timeline and click to create them.
Ripple edits to avoid extra clicks (B)
The ripple edit tool will make a cut where you click and instantly close the gap created by that edit. So instead of needing to make multiple clicks every time you edit something, ripple edit streamlines the entire process and saves you a second or two for each edit.
The more you ripple trim previous edit, the more valuable this shortcut becomes.
Ripple delete to also avoid extra clicks (Shift + Delete)
If you think the ripple edit tool is a convenient and straightforward way to make a cut, then we've got good news – it's got a sibling tool that's just as easy to use. Ripple delete does the exact same thing, but obviously removes a clip and then snaps the surrounding clips to keep from creating any strange gaps in your timeline.
Match frames in your footage (F)
If you work on a lot of projects or large projects with a ton of footage, you might find it difficult to keep track of every shot available for the project. Using match frame will open the master clip in the source monitor, letting you backtrack without manually scrolling through different clips and sequences.
Snap clips on a timeline (S)
Chances are good that you’ve made an edit before and forgotten to readjust the timeline, creating a weird gap in audio or video that throws everything off.
Well, snapping gets around that. Using this keyboard shortcut toggles snapping, which automatically aligns clips while you are cutting and trimming sequences.
Revert your cursor whenever you want (V)
Making different edits in Adobe Premiere Pro will — by default — adjust your cursor to indicate the action you are taking. (For example, when you’re making a cut, your cursor will transform into a razer as a visual reminder of what you’re doing.)
This simple keyboard shortcut reverts your cursor so you can stop accidentally cutting footage.
Rewind, pause, and skip through your footage (J, K, L, SPACE)
Knowing how to navigate through footage creates some must-have keyboard shortcuts…or, in the case of Adobe Premiere Pro, a series of keyboard shortcuts.
Here are each of the shortcut keys for managing playback:
- Start or stop playback by hitting SPACE
- Hit J to rewind (and keep hitting it to jump further back)
- Hit L to skip ahead (or press it a bunch to go further ahead)
- Hit K to stop playback
Similarly, using the left or right arrow key will jump by one frame in either direction.
Group and ungroup clips (Ctrl + G, Ctrl + Shift + G)
Sure, it can be easy to right click and manually group clips on a timeline. But how much easier is it to use a single keyboard shortcut? The G key is your secret to group, ungroup, and regroup clips to your heart’s content.
Track select forward on the timeline (A)
The easiest way to select a whole bunch of clips on your timeline is with this shortcut. By selecting a specific clip and using track select forward, you’ll grab all the clips in the sequence that come after it.
Slip tool and Slide tool to adjust clips by frame (Y, U)
Technically, these are two separate tools. But the actions are similar enough that if you use one, you’re probably also going to use the other.
The reason for that is both are tools used by filmmakers who edit directly with their footage on the monitor. The Slip tool lets you move the in and out points within the entire unedited clip, giving you a chance to choose the exact frame to make your cuts (while seeing all options).
And while the Slip tool moves an edit within the broader clip, the Slide tool lets you move the clip forward and backward on the entire timeline. It’s a way to visualize frame-by-frame adjustments (while keeping the same in and out points) before you commit to an edit.
Rate Stretch to alter playback speed (R)
This one is kind of a niche keyboard shortcut. But if you ever want to affect playback speed, you can speed up or slow down clips with Rate Stretch. The good news is that these adjustments don’t affect where the clip starts and stops — it’s literally only affecting the speed.
It isn’t the cleanest way to change the Speed/Duration settings of a clip, but accessing it in a keyboard shortcut certainly saves you time and effort.
Panel shortcuts
Lastly, it's worth noting that Premiere Pro has a separate set of panel shortcuts. Panels are the different "workstations" within a project, from coloring tools to audio mixing to the timeline itself.
There may be times when you want a dedicated shortcut for the same panel you keep working in. And a panel shortcut can help you navigate between separate panels without having to open, close, or rearrange your workstation every 5 minutes. You can even set a panel shortcut so a specific key combination do different things depending on which panel you're working in at the moment.
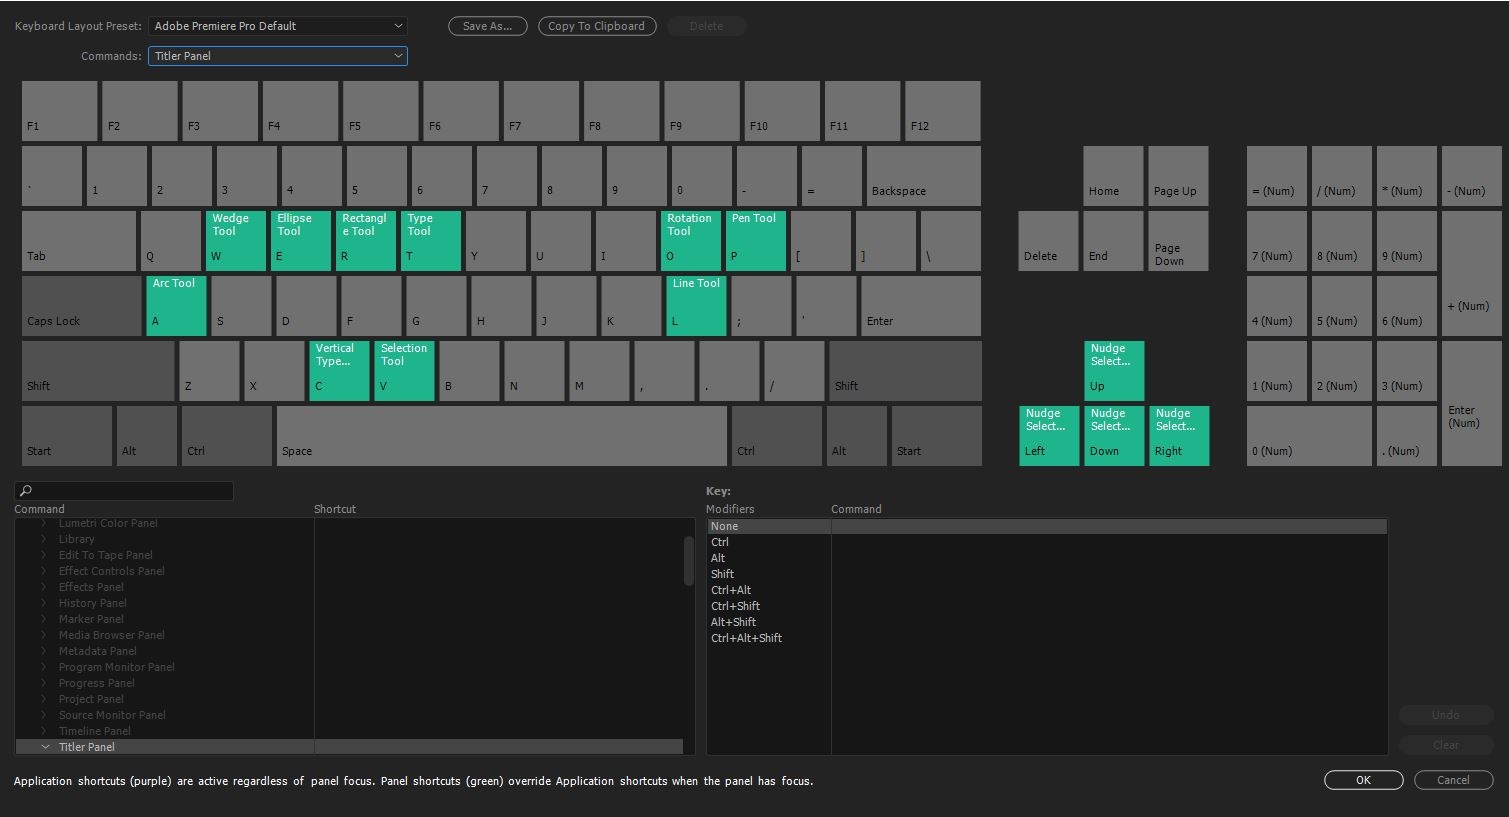
Obviously this adds yet another layer of complexity to keyboard shortcuts, so we won't cover this sub-topic today. But you can check out this tutorial from Adobe if you're curious in learning more about panel shortcuts.
Further reading
If you're a fairly new editor or Adobe Premiere Pro user, then you probably found at least one Premiere Pro keyboard shortcut on this list that will become part of your routine. They’re easy tools to streamline your post-production workflow and let you get the most out of your time in post-production (which for most creators is the least exciting part of the process).
Obviously this list is literally just a scratch on the surface of all the Adobe Premiere Pro shortcuts out there. (And the fact that you can adjust customized keyboard shortcuts means you can shift any of these around to any other key combinations you want.)
To take advantage of other tools and tutorials, here are a few more articles from the Soundstripe blog:

